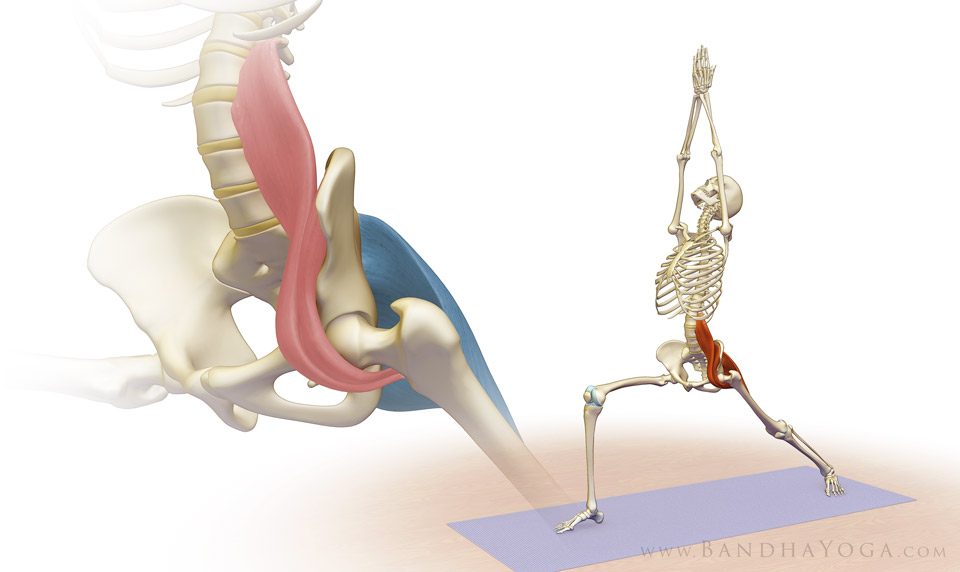
The Psoas Awakening Series synergistically combines the standing poses to awaken the psoas muscle. We accomplish this by first contracting the psoas in poses that face forward, then in poses that face the side. We complete the series with twisting postures.

Click here to review the details of this important muscle.

Remembering that this muscle is usually “hidden” in the unconscious part of the brain, we must first isolate the psoas in each pose, bringing it back to consciousness.

I use the technique of isometric contraction to isolate and awaken a dormant muscle. This technique requires an understanding of the action of the various muscles. For example, the psoas acts to flex the hip, i.e., contracting the psoas either bends the trunk forward or draws the knee up. If you are contracting your psoas on one side, it laterally flexes your trunk. It is also synergizes external rotation of the hip.

Isolate your psoas (and its synergist muscles) by attempting to flex the trunk or by trying to lift the leg. Accentuate this by resisting the action. Check out figure 1 below for how to do this with Trikonasana. You can then transport the technique to other poses.
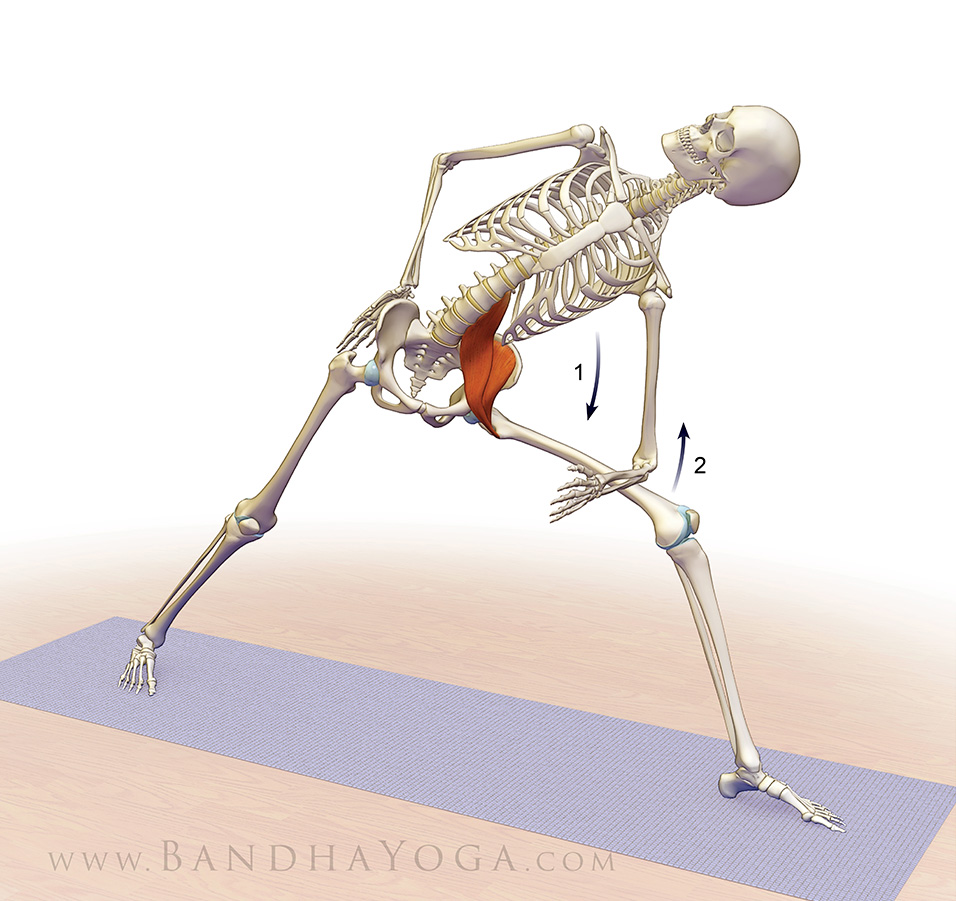
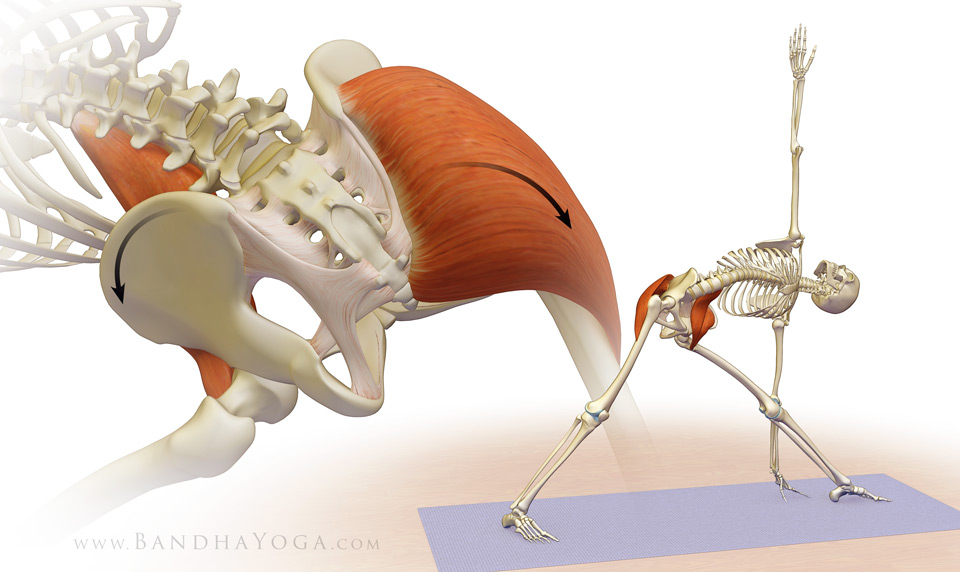
Figure 1: Engaging your psoas.

Place your elbow on your thigh as shown. Then, attempt to press the elbow down against your thigh by flexing your trunk to the side (arrow 1). Relax for a moment and then attempt to lift your leg straight up against your elbow. Finally, press down with your trunk and attempt to lift your leg against your elbow simultaneously. Neither your trunk nor your thigh will move in either of these actions, but you will feel your psoas muscle engage in your pelvis.

Remember, it is not necessary to use maximum contraction. Work with around twenty percent of your max force. Use gradual engagement with these cues and ease in to the contraction. Similarly, ease out of the movement and pose.

This general sequence will be repeated for each pose throughout the series.


Figure 2: Co-contracting your glutes and psoas.


Balance and stabilize your pelvis by contracting your back leg gluteus maximus. Note that the psoas of your forward leg creates a force that tilts your pelvis forward while the glute of the back leg tilts the pelvis back. These two forces act across the strong ligaments of the pelvis to stabilize the entire unit. This is known as "ligamentotaxis". Feel how this action stabilizes your pose from your core.


Figure 3: Balance Contraction with Stretch


Remember that Hatha Yoga combines opposites—the sun and moon or yin and yang. With this in mind, balance contracting the psoas by stretching it.

Figure 3 illustrates the genius of Hatha Yoga standing poses. While you contract your psoas in the forward leg, you relax and stretch your psoas of the back leg. Thus, each side of the pose balances the other.


Finally, experience “Body Clairvoyance.” This refers to the awakened body’s ability to anticipate an action and use the most efficient muscles to accomplish it—without thinking about it. The Psoas Awakening Series sequentially activates different parts of the psoas—incrementally and synergistically. When the brain sees a conscious combination of actions like this, it will then automatically use the psoas in unrelated actions. This is analogous to running up a flight of stairs. The first steps are taken consciously, but once we get going we ascend unconsciously (and rhythmically).  The act of typing on a keyboard is another example of this.

Put another way, once we’ve awakened the dormant psoas muscle, we begin to use it unconsciously in new tasks.

I demonstrate this phenomenon in my workshops by finishing the Psoas Awakening Series with an inversion such as Full Arm Balance. Students regularly report a sensation of rock solid stability in their pose. This comes from the unconscious brain automatically activating the newly awakened psoas and stabilizing the pelvis. Experience this for yourself by practicing an unrelated asana at the end of the series.

Learn more about accessing and awakening your mind body connection with our Yoga Mat Companion books.

Click here for a look inside the first book in the series:
"Anatomy for Vinyasa Flow and Standing Poses"

Swipe the images or use the slider below to navigate the Psoas Awakening Series.

Tadasana

Begin with Tadasana, the Mountain Pose. Return to this pose between doing the alternate sides of the body in the Psoas Awakening Series.

Trikonasana - Preparatory Pose 1

Begin with your front knee slightly bent. Slight flexion of the knee releases the hamstrings at their origin on the ischial tuberosity, allowing the psoas to contract freely. Now, place the elbow on the front thigh and press down with the torso, attempting to flex it. This action isometrically contracts the psoas.

Trikonasana - Preparatory Pose 2

A variation in Trikonsana is to press down against a block to flex your trunk.

Trikonasana

Imagine lifting the forward leg straight up toward the ceiling to engage your psoas. Combine this with engaging the back leg glutes as described.

Virabhadrasana II

Next, work with Warrior II. Imagine lifting the entire forward leg straight up toward the ceiling to engage your psoas.

Utthita Parsvakonasana - Preparatory Pose

As you progress towards Utthita parsvakonasana, place your elbow on your knee and press down with the trunk or lift up against your elbow with the thigh. This is also a good time to engage the glutes of the back leg and feel the stability in your pelvis.

Utthita Parsvakonasana

Come into Utthita parsvakonasana (use a block to support your hand if needed). Press the side of your forward leg knee into your arm. Engage the back leg glutes.

Ardha Chandrasana - Preparatory Pose 1

Moving into Ardha chandrasana, begin with a high version of Trikonasana. Place your forward hand onto the shin and press the trunk down through your arm. Also, imagine lifting the entire front leg straight up against your hand.

Ardha Chandrasana - Preparatory Pose 2

Step the back foot in and the front hand forward about a foot or so. Keep your supporting leg knee flexed and then tilt the trunk forward and, at the same time, lift the back leg (like a teeter totter). Maintain the forward knee bent until the back leg is lifted (don't imediately come into the full pose).

Ardha Chandrasana

Then, engage your quadriceps to straighten the front knee and raise your pelvis gradually like a hydraulic lift. Your psoas will stabilize your pelvis. Typically, you will begin to feel your psoas engaging automatically at this point in the series.

Parsvottanasana - Preparatory Pose 1

Begin by bending the front knee, as with Trikonasana. Now, squeeze your torso against the thigh (and the thigh against your torso). This activates your psoas in the side plane, walking the engagement around the muscle.

Parsvottanasana

Maintain your trunk against your thigh as much as possible--you may come up a bit. Then, engage the forward leg quadriceps to straighten your knee. At the same time, engage the back leg glutes.

Virabhadrasana I

Attempt to lift your front leg straight up towards the ceiling in this pose—but don’t actually lift it. You should feel the pelvis stabilize with this action, again through contracting the psoas (also in the side plane).

Parivrtta Trikonasana - Preparatory Pose 1

This pose works your psoas with the pelvis rotated. As with Parsvottanasana, bend the front knee to release the hamstrings. Then squeeze the torso against the thigh to engage the psoas.

Parivrtta Trikonasana

Hold the torso against your thigh then contract the quadriceps to straighten your knee. Press your forward hand into the side of your foot. Engage the back leg glutes to balance and stabilize your pelvis.

Parivrtta Parsvakonasana - Preparatory Pose 1

Begin in a twisted lunge, with the back knee on the floor. Place the opposite side elbow on the front knee to turn the body. As with Parivrtta Trikonasana, gently squeeze the torso against the front thigh. This isometrically contracts the psoas.

Parivrtta Parsvakonasana

Engage your back leg quads and glutes to lift and extend the back leg and come into the pose.

Prasarita Padottanasana - Preparatory Pose 1

Here we return to the frontal plane. Bend the knees to release the hamstrings as flex forward. You should find that you can consciously access the psoas at this point in the series. Contract the psoas to flex the hips.

Prasarita Padottanasana

Holding the torso flexed, engage your quadriceps to straighten the knees. Bring your abs into the final pose to synergise flexing and stabilizing your trunk.

Psoas Stretch - Preparatory Pose 1

Finish the series by stretching your psoas in a lunge. This stretches the back-leg psoas by extending the hip. Contracting the back-leg glutes accentuates this stretch. Hold this for several breaths.

Psoas Stretch

Contract the back leg glutes and bend your front knee to deepen the stretch of the psoas. Inhale completely and on the exhalation, go deeper into the pose.

Purvottanasana - Preparatory Pose 1

Now try an unrelated posture that you have experience with. I use Purvottanasana preparation here. Note how the psoas automatically engages now that it is awakened, stabilizing the pose. This is “Body Clairvoyance.”

Purvottanasana

Engage the quads to straighten your knees and come into full Purvottanasana. Again, note how the pelvis feels stable. This refinement comes from your psoas.

Supported Setu Bandha

Finish with a passive stretch of the psoas by placing a block or bolster under the sacrum. Close the eyes and relax for several minutes. Please note that if you experience back pain in this posture, come out of the pose. Check with your teacher for modifications.

Savasana

Relax in Savasana.
Download printable version

Practice tips:

1) Always build contraction of a muscle gently and slowly. This aids to minimize the risk of injury and soreness.

2) Only contract the psoas to approximately 20% of its maximum force.

3) Awakening a muscle is accomplished by contracting it. Balance engaging a muscle by stretching it at the end of your practice.

4) Allow ample time for recovery between practice sessions.

5) Always practice under the guidance of an experienced teacher.

6) Always, in your particular case, consult your health care provider before doing yoga or any exercise program.

If you are new to integrating anatomy into your practice, remember that it is not necessary to memorize this technique on your first pass. Begin by enjoying the beautiful images of the body in yoga. This alone will awaken your brain's awareness of the anatomy during your practice.  Return at a later date for a closer look, and then gently go through the motions illustrated above as you do the pose. Then leave it. Your unconscious mind will create new circuitry while you rest. Enjoy this process, and when you return to the mat, you will be surprised at how easily you access this technique.

You can apply this same technique of muscle awakening to your accessory muscles of breathing and dramatically expand your chest during your poses and pranayama. Click here for more information.

Namasté,

Ray and Chris